The Problem: Studying Physics Is Hard When You Just Get Answers
I often find myself exploring subjects I find academically interesting even if they don’t have personal relevance to my own professional work. Problems, and their solutions, are a valuable asset, but you can often “spoil” yourself by looking at the solution too early. I wanted a way to bridge this divide by given hints based off the solutions while not giving the whole game away.
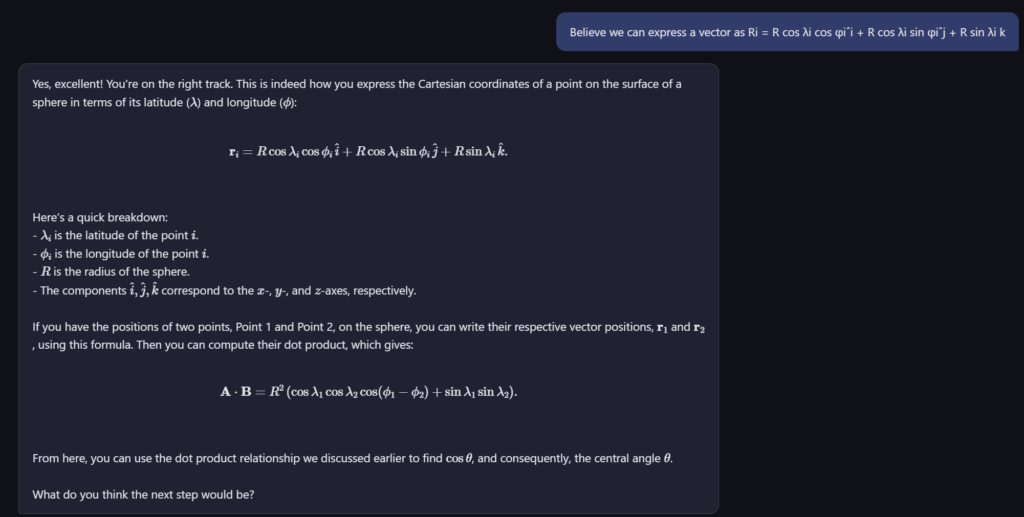
That’s why I built Physics AI Tutor — a web-based AI assistant that acts as a Socratic study partner. You feed it your textbook material and problem sets, ask it questions, and instead of handing you the answer, it guides you with hints and questions to help you reason through the problem yourself.
How It Works
The tutor is built around three core ideas:
Your content, your curriculum. Upload your own textbook chapters, lecture notes, or problem sets as PDF or text files. The system extracts the text, splits it into chunks, and stores it in a local vector database for fast retrieval.
Semantic search for relevant context. When you ask a question, the app uses sentence embeddings (via sentence-transformers) and FAISS to find the most relevant passages from your uploaded material. These are provided to the AI as reference — so its hints are grounded in what you’re actually studying.
Socratic prompting. The AI is instructed to never reveal the full solution. Instead, it gives one hint at a time, asks guiding questions (“What forces are acting on the block?” or “What conservation law applies here?”), and gradually increases specificity if you’re stuck.
The Tech Stack
The project is a lightweight Python web app that runs locally on your machine:
FastAPI — serves the web UI and handles file uploads and chat requests
GPT-4o via GitHub Models — powers the tutoring conversation (free with a GitHub Copilot subscription). You could easily re-engineer it to use a model of your choosing.
FAISS + sentence-transformers — local vector search for retrieving relevant textbook passages
PyPDF — extracts text from uploaded PDF files
MathJax — renders LaTeX equations in the browser so formulas display correctly
The entire app is self-contained — no external databases, no cloud storage. Your textbook content stays on your machine.
A Typical Study Session
Here’s what using it looks like in practice:
Start the server and open localhost:8000 in your browser
Upload a chapter on electrostatics from your textbook PDF
Type: “A point charge of +3μC is placed 0.5m from a -2μC charge. What is the force between them?”
The tutor responds: “Good question! What law describes the force between two point charges? What quantities do you need?”
You reply: “Coulomb’s law — I need the charges and the distance”
The tutor: “Exactly! Now, can you write out Coulomb’s law and plug in the values? Remember to pay attention to the sign of the force — what does it tell you about the direction?”
The AI draws on the textbook passages you uploaded to make its hints specific and relevant, but it never just hands you the formula with numbers filled in.
Why Not Just Use ChatGPT?
You absolutely can ask ChatGPT physics questions. But there are two key differences with this approach:
It’s tuned to teach, not answer. General-purpose chatbots default to giving complete solutions. This tutor is specifically prompted to hold back and make you think. It takes deliberate prompt engineering to maintain that behavior consistently across a conversation.
It knows your textbook. By uploading your specific course material, the hints align with the notation, methods, and examples your chosen learning material uses — not some generic explanation from the internet.
Getting Started
The project is open source and runs locally with Python. You’ll need:
Python 3.11+
Programatic access to an LLM of your choosing (API key)
Securing OpenClawd in the Cloud: A Defense-in-Depth Walkthrough
Personally, I fear the damage an unrestrained AI Agent can do too much to ever allow it to handle my personal credentials. Nonetheless, I stumbled across this great video from Kai Lentit (https://www.youtube.com/watch?v=40SnEd1RWUU) that gives an unironically good tutorial for a secure VPS deployment of Openclaw with some good comedy. I had been seeking an excuse to experiment with Terraform and Ansible for awhile, an endeavor I have not had the opportunity to perform at work, and thus I decided to generally replicate the process described in this video using TerraForm and Ansible instead of manually configuring it.
By “secure” I mean, of course, as secure as these agents can be. One still needs to exercise immense caution when using it and, ideally, creates emails, accounts, etc., solely for use with Openclaw and which don’t have access to sensitive information.
The Threat Model
Before diving into controls, it helps to name what we’re defending against:
Credential theft — bot tokens, API keys, and secrets leaking or being exfiltrated.
Unauthorized access — someone gaining a shell on the VM.
Brute-force attacks — automated SSH login attempts (they start within minutes of a public IP going live).
Lateral movement — an attacker who compromises the application escalating to root or pivoting to other services.
Unpatched vulnerabilities — known CVEs sitting unpatched because no one remembered to run apt upgrade.
Every choice below maps back to one or more of these threats.
Layer 1: Network Perimeter — NSG + WireGuard
The design
The Azure Network Security Group (NSG) only allows two inbound ports:
Port
Protocol
Purpose
22/tcp
SSH
Bootstrap only — removed after first Ansible run
51820/udp
WireGuard
VPN tunnel
Both rules scope the source address to a configurable CIDR (allowed_ssh_cidr), so even during initial setup, only your IP can reach the VM.
After Ansible finishes, the SSH-Bootstrap rule is deleted from the Terraform config and terraform apply closes port 22 for good. From that point on, the only way to reach the machine is through the WireGuard tunnel.
Why it matters
A publicly reachable SSH port is the single most scanned service on the internet. By removing it entirely post-bootstrap and funneling all management traffic through WireGuard, we eliminate the most common entry vector. The VPN uses modern cryptography (Noise protocol framework, Curve25519, ChaCha20-Poly1305) and has a tiny attack surface — unauthenticated packets are silently dropped, so port scanners don’t even get a response.
Layer 2: Host Firewall — UFW Default Deny
The NSG is a cloud-level control. Defense in depth means we don’t trust a single layer, so the VM itself runs UFW with a default-deny incoming policy:
22/tcp — temporarily, for bootstrap (mirrors the NSG rule).
2222/tcp from 10.100.0.0/24 only — SSH, but only from the WireGuard subnet.
51820/udp — WireGuard itself.
Even if someone misconfigures the NSG or Azure adds a surprise rule, UFW independently blocks everything else. Two firewalls, two layers, two chances to catch a mistake.
IPv6 is a common blind spot. Many firewall rules only cover IPv4, leaving IPv6 wide open. Since OpenClaw doesn’t need IPv6, disabling it at the kernel level removes the entire class of risk.
Layer 3: SSH Hardening
SSH is the admin’s front door, so it gets its own hardening pass:
Port 2222
PermitRootLogin no
PasswordAuthentication no
PubkeyAuthentication yes
AllowUsers claw
MaxAuthTries 3
LoginGraceTime 30
X11Forwarding no
Breaking this down:
Non-standard port (2222) — Not security by itself, but it filters out the vast majority of automated scanners that only hit port 22. Combined with the VPN requirement, it’s another obstacle in the chain.
Key-only authentication — Passwords can be guessed. SSH keys can’t be brute-forced in any practical sense. disable_password_authentication = true is also set at the Terraform level on the VM resource itself, enforcing this from the moment the machine boots.
No root login — Even if an attacker steals the claw user’s private key, they land in a non-root shell. Privilege escalation requires sudo, which is logged.
AllowUsers claw — Only one user can SSH in. The azureuser bootstrap account is locked out of SSH entirely after hardening.
MaxAuthTries 3 + LoginGraceTime 30 — Three wrong attempts and the connection drops. 30 seconds to authenticate or get disconnected. This limits brute-force velocity even before fail2ban kicks in.
Two separate SSH key pairs
The project uses two different keys for two different trust levels:
id_rsa — the bootstrap key. Used by Terraform and Ansible during initial provisioning. After the WireGuard tunnel is up and port 22 is closed, this key becomes useless.
claw_ed25519 — the operational key. Used for day-to-day access via the VPN tunnel. Ed25519 is a modern, fast, and secure algorithm with smaller key sizes than RSA.
This separation means compromising the bootstrap key after deployment gives an attacker nothing — there’s no port to use it on.
Layer 4: fail2ban — Brute-Force Protection
Even behind a VPN, defense in depth means assuming the VPN could be bypassed:
Three failed login attempts within 10 minutes triggers a 1-hour IP ban. This runs on the host, independent of the NSG and UFW. If an attacker somehow reaches port 2222, they get three guesses — then they’re firewalled at the OS level.
Layer 5: Least-Privilege Application Isolation
The OpenClaw bot doesn’t run as root. It doesn’t even run as a generic user with broad permissions. The systemd unit enforces strict sandboxing:
The process and its children can never gain new privileges (blocks setuid, capability escalation)
PrivateTmp=true
The service gets its own /tmp, invisible to other processes
ProtectSystem=full
/usr, /boot, and /etc are mounted read-only for this service
ProtectHome=read-only
Home directories are visible but not writable
LimitNOFILE=4096
Caps the number of open file descriptors, limiting resource exhaustion attacks
If the Node.js process is compromised — say, through a dependency supply-chain attack — the attacker lands in a sandbox where they can’t modify system files, can’t escalate privileges, and can’t touch other users’ data. This is the difference between “the bot got popped” and “the server got popped.”
Layer 6: Secrets Management
Application credentials live in /etc/openclaw.env:
Owned by root, group-readable by claw — The claw user (and therefore the bot process) can read the file, but can’t modify it. An attacker who compromises the bot can read the current secrets but can’t plant a backdoor in the env file.
force: false — Ansible won’t overwrite existing credentials on re-runs. This prevents accidental secret wipes during configuration updates.
EnvironmentFile= in systemd — Secrets are loaded directly into the process environment by systemd, not read from disk at runtime by the application. This avoids the common mistake of passing secrets as command-line arguments (which are visible in /proc).
Security patches are applied automatically, daily, without human intervention. Only security-channel updates are pulled — no surprise major version bumps. Automatic reboots are disabled to avoid unexpected downtime; kernel updates that require a reboot will wait for a maintenance window.
This is a pragmatic trade-off: the vast majority of Ubuntu CVEs are fixed by package updates that don’t require a reboot; the small remainder can be handled during scheduled maintenance.
Backups aren’t traditionally a “security” control, but they’re essential for recovery from ransomware, accidental deletion, or a compromised deployment. The backup directory has restricted permissions (0750), and the backup runs as the claw user — not root — limiting what a compromised backup job could access.
Layer 9: Infrastructure as Code — The Meta-Security Layer
Everything described above is codified in Terraform and Ansible. This is itself a security property:
Auditability — Every security control is version-controlled. You can diff changes, review PRs, and trace when a firewall rule was added or removed.
Reproducibility — A compromised server can be torn down and rebuilt from scratch in minutes. terraform destroy && terraform apply, run the playbook, restore from backup. No hand-configured snowflake servers with mystery configs.
Drift detection — terraform plan shows if someone manually changed the NSG rules outside of code. Ansible’s declarative tasks ensure the OS config matches the playbook on every run.
The Full Picture
When you zoom out, the security architecture forms concentric rings:
No single layer is “the” security. Each one assumes the layer above it could fail. That’s defense in depth — and it’s what turns a “running a bot on a VM” project into something you can actually trust in production.
The full source is available on GitHub. This project is a rough implementation, and may contain vulnerabilities I didn’t account for. If you spot something that could be improved, open an issue. You can find my project here
I imagine the overlap in the venn diagram between IT professionals and “giant nerds” is pretty significant. I’m certainly both, and one of my favorite hobbies is partaking in a good old-fashioned D&D 5e campaign. Over the years, my group has taken a liking to Foundry VTT, an amazing engine for hosting tabletop RPGs of all varieties. With some carefully curated modules, you can automate a ton of functionality to remove the toil of bookkeeping and focus on the fun bits: namely roleplaying and combat.
A screenshot of Foundry, albeit one with many modules. (If you also play OldSchool RuneScape, bonus points to you, reader.)
I’m usually the DM of our group. Some might consider this torture, but I actually quite enjoy the task of designing a story and world to facilitate it. That said, the work can be admittedly laborious — especially for a homebrew campaign. So many custom items, spells, and actors to create.
In an attempt to ease my suffering, I noticed that some people were selling Foundry AI tools that could hook up models to your world. I was initially tempted to spend the money, but unfortunately they all followed the trend of requiring a subscription. So after much self-convincing, I set about making my own.
And that’s exactly what I built. Foundry MCP is a local-only MCP (Model Context Protocol) server that connects any AI client — Claude, Cursor, or anything that speaks MCP — directly to a live Foundry VTT world. As of the writing of this post, it exposes 67 tools across 10 domains.
Design Decisions
There were a few requirements I wanted this tool to meet:
Local-only by design. While there are advantages to running things in the cloud, my use case only required it to run locally on my LAN. Your campaign data never leaves your machine. Future versions could potentially expand this to run via a domain in the cloud.
Discovery-first tool design. Tools are designed so the AI naturally discovers what it needs. It calls list-actors to find character IDs, then get-actor for details, then roll-attack with the right weapon. This mirrors how a human DM navigates Foundry.
Bidirectional sync. The Foundry module pushes data to the gateway, and the gateway pushes commands back. The AI always has a fresh snapshot of the world without polling Foundry directly.
System-aware. The D&D 5e tools know about proficiency, skill codes, and ability modifiers. When the AI rolls a Stealth check, it resolves the same way a player clicking the skill button would.
Architecture
The architecture is three layers, all running locally:
A Foundry module (foundry-api-bridge) runs inside the browser. It connects via WebSocket to the gateway and pushes world data — actors, journals, scenes, items — every 30 seconds. It also listens for commands and executes them using Foundry’s API.
A Python gateway (FastAPI + uvicorn) sits in the middle. It stores the latest world state in memory and forwards commands to Foundry through the WebSocket. This is the single source of truth the AI talks to.
A Python MCP server exposes 67 tools over the Model Context Protocol. Any MCP-compatible AI client can connect via stdio or HTTP and start interacting with the game world.
67 Tools Across 10 Domains
The tool surface covers nearly everything a DM does:
Actors — List, search, create, update, and delete characters and NPCs. Pull full character sheets with HP, AC, abilities, skills, and inventory.
Combat — Create encounters, add combatants, roll initiative (individual or group), advance turns, mark defeated, end combat. The full encounter lifecycle.
D&D 5e Rolls — Skill checks, saving throws, ability checks, attack rolls, damage rolls. All 18 skills, all 6 abilities, with proficiency baked in. Results post directly to Foundry’s chat log so players see them.
Items — Full CRUD on actor inventory and world items. Use potions, cast spells, activate items with Midi-QOL targeting support.
Journals — Create, read, update, and delete journal entries and pages. Organize into folders. Great for AI-generated session notes or lore.
Tokens & Scenes — Place, move, and update tokens on the map. List and switch active scenes.
Compendiums — Browse, search, and pull official content. Import monsters, spells, and items directly from SRD packs.
Effects & Conditions — Toggle conditions like blinded, poisoned, or prone. Apply custom effects with stat modifications.
What This Actually Looks Like
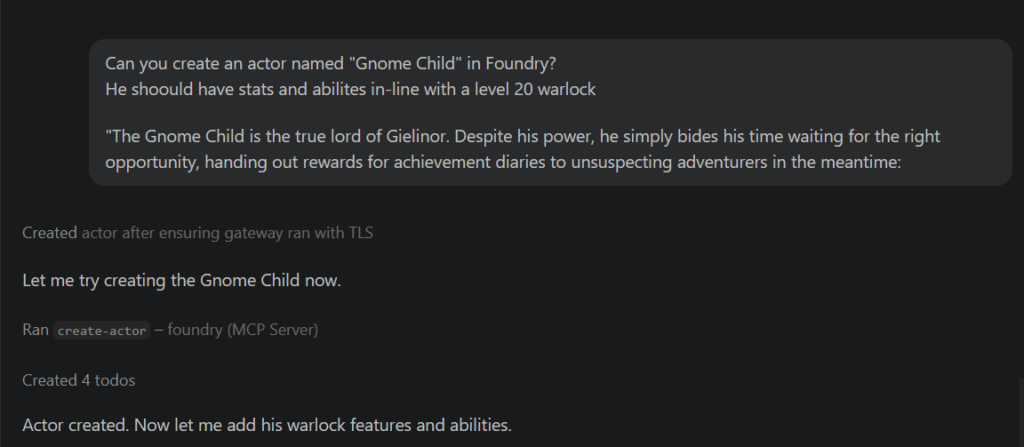
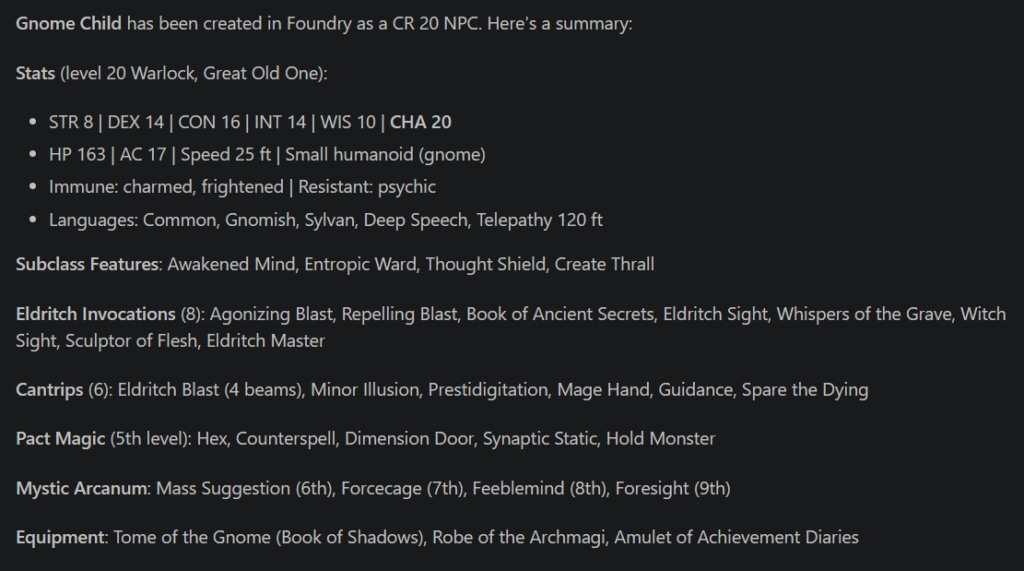
Below is an example where I use the Foundry MCP to create an actor:
Of course, we want to verify this was actually created in Foundry — and sure enough, there’s our Gnome Child actor:
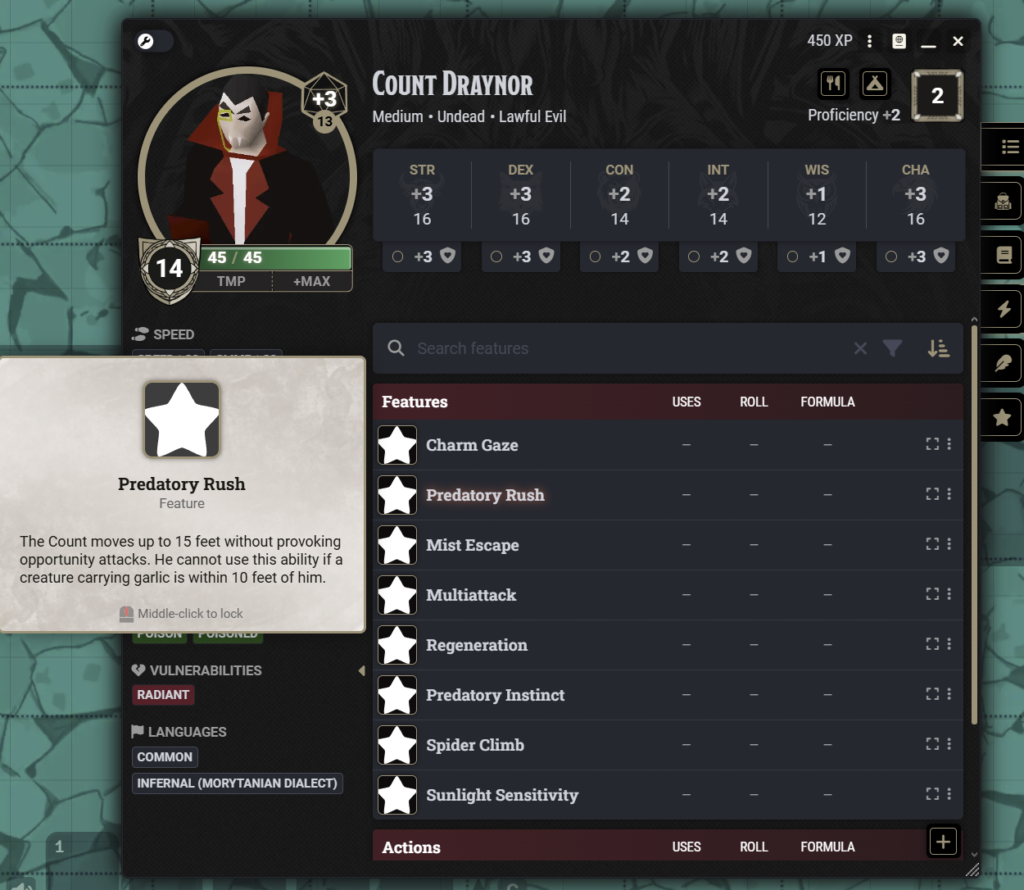
Anyone familiar with D&D knows a true Level 20 character would likely be much more powerful, but even with the need to tweak things, this is still a significant time-saver when creating custom characters. Below is an example of a Count Draynor boss I made for my own campaign, complete with custom abilities:
What’s Next
I’m actively developing Foundry MCP. The tool count keeps growing as I find new things I want the AI to handle — more granular token control, deeper system integration, and scene manipulation are all on the roadmap. The project is MIT licensed, so if you’re a Foundry VTT user who wants to experiment with AI-assisted gameplay — whether that’s solo adventures, automated encounter management, or just having a tireless assistant for session prep — feel free to check it out. You can the repo on Github here